
Waterproofing a basement floor may help reduce moisture and minor seepage on unfinished concrete. However, if water is coming through walls, perimeter joints, or foundation cracks, simply sealing the floor may not resolve the issue. This guide covers the basic DIY steps to help protect a concrete basement floor, along with signs it may be time to call a professional for a more complete basement waterproofing solution.
If you are dealing with a damp basement floor, you are not alone. Many homeowners notice moisture issues only after they spot water stains, musty odors, or puddles on the concrete. Even minor seepage can make your basement less usable and, over time, may contribute to bigger problems, such as water damage or foundation issues.
The good news is that some basement floor moisture issues can be addressed with the right preparation and a waterproofing product. Below, we’ll walk through how to waterproof a basement floor in five steps, plus when a DIY fix may not be enough.
In This Article
Can You Waterproof a Basement Floor Yourself?
Yes, you can waterproof your basement floor yourself with a concrete sealer or an epoxy coating, as long as the issue is limited to minor dampness seeping through the concrete slab.
DIY basement floor waterproofing can help reduce mild condensation and protect the concrete surface. However, sealing a basement floor does not always stop leaks. If your basement has standing water or if water is actively leaking through wall cracks or the perimeter joint where the floor meets the wall, a DIY floor sealer will not be enough. In those situations, you will want to address the source of the intrusion with a more complete basement waterproofing approach.
Signs You Need to Waterproof Your Basement Floor
Most of us don’t think much about our basements until moisture becomes a problem. Knowing why water is coming through your basement floor is important if you want to help prevent more serious damage over time.
Look for these signs of foundation damage, as it may be time to act:
- Water stains on the floor or walls
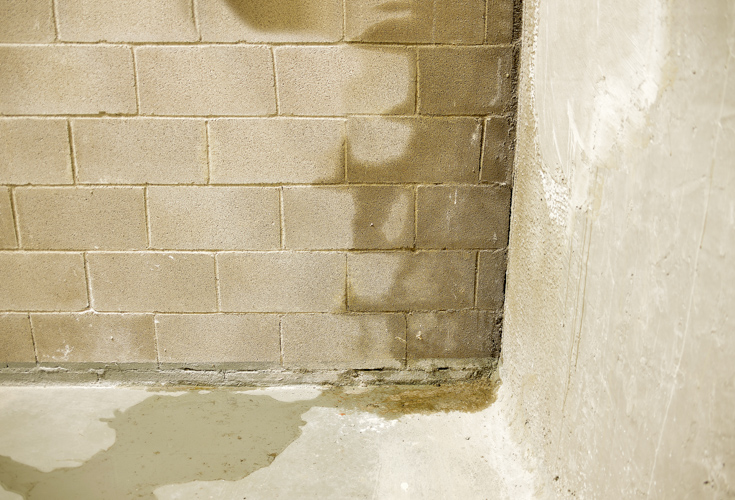
- Seepage around the edges of the basement floor
- Water puddles on the concrete slab
- Cracks in the floor and visible moisture seeping through
- Unwanted musty smells in the basement
If you notice any of these issues, take action right away. Over time, excess moisture can undermine your foundation, leading to basement flooding and more serious structural damage.
Before You Start: Basement Floor Waterproofing Checklist
Before applying any basement floor sealer or epoxy basement floor waterproofing, make sure your space is properly prepared. Use this quick checklist before you begin:
- Confirm there is no standing water.
- Remove stored items from the floor.
- Clean and completely dry the concrete slab.
- Check for major foundation cracks.
- Test for radon if needed
- Read all product instructions carefully.
5 Steps to Waterproof a Basement Floor
If you have an unfinished or exposed concrete basement floor and want to reduce moisture coming through the slab, follow these five steps.
1. Clear the area
First, clear the basement floor, so you have room to work. If you can’t remove everything at once, move items to the side, waterproof the open area, then repeat this process for the rest of the floor.
2. Clean and prep the concrete
Next, thoroughly clean the concrete floor so the waterproofing product adheres properly. Scrub loose material off with a wire brush, then vacuum all dust and debris. Degrease any oily spots to help prevent any bonding issues with sealers, then finish by washing the floor with a concrete cleaner
3. Check for radon and Safety issues
Before waterproofing, it’s smart to test your basement for radon using a home test kit. Radon is an odorless, invisible gas that can get into the basement through small cracks in the foundation or floor. Elevated radon levels require professional attention before waterproofing. Also, ventilate the area well and wear protective gear such as gloves and a mask during application for safety
4. Repair cracks and joints
Moisture can enter through visible cracks and gaps around the perimeter of your floor. Inspect the slab carefully, then fill small cracks with a high-quality concrete crack filler. If any of the cracks on your floor are wider than a half inch, it’s best to consult professionals, since larger cracks may point to a more significant foundation issue.
5. Apply a waterproofing product
Once the floor is clean, dry, and fully prepped, you can apply a waterproofing product. Follow the manufacturer’s instructions carefully and use brushes and rollers to apply an even coat. Try to apply products only when the air is dry, since excess moisture can affect the finish and performance as well as your basement air quality.
Basement Floor Sealer vs. Epoxy Coating
When deciding how to seal a basement floor, homeowners generally have two options: a waterproof concrete sealer or an epoxy coating.
| Option | Best for | Appearance | Durability | Limitations |
| Waterproof Sealer | Minor dampness and cost-effective moisture resistance | Clear, natural concrete look | Moderate | Does not fill gaps or stop active, heavy leaks |
| Epoxy Coating | Long-lasting protection and a finished floor appearance | Glossy, tinted, or speckled finish | High | Requires careful surface preparation and acid etching |
A waterproof concrete sealer helps reduce moisture migration through porous concrete and is often the more budget-friendly option. Epoxy, on the other hand, is a resin-based coating with built-in waterproofing qualities that also adds durability and creates a more finished appearance.
When Sealing the Floor Is Not Enough
Knowing how to waterproof a basement floor can be helpful, but it is just as important to understand the limits of a DIY solution. Floor coatings work well for minor dampness and moisture vapor that can come through a concrete slab.
However, if hydrostatic pressure is forcing water through the cove joint where the wall meets the floor, or if water is entering through basement walls, sealing the floor alone will not solve the problem. In some cases, it can even cause coatings to peel or bubble over time by trapping water underneath.
When moisture issues extend beyond the slab itself, a more comprehensive waterproofing system may be needed to manage water at the source.
Frequently Asked Questions
Can I waterproof my basement floor myself?
Yes, you can apply a waterproof sealer or epoxy coating yourself if the issue is limited to minor concrete dampness. If you have active leaks, standing water, or moisture coming through the walls or perimeter, a professional waterproofing system may be necessary.
why is water coming through my basement floor?
Water leaks through basement floors due to hydrostatic pressure in the soil beneath your home. This pressure can push groundwater through porous concrete or small cracks in the slab.
does sealing a basement floor stop leaks?
Sealing a concrete basement floor can help reduce minor moisture vapor and dampness, but it will not stop active water leaks or flooding. If water is entering through wall joints, perimeter seams, or large cracks, you most likely need an interior drainage system.
What is the best way to waterproof a basement floor?
The best way to waterproof a basement floor depends on the severity of the water issue. For minor dampness, an epoxy coating or silane-siloxane sealer works well. For persistent leaks or water intrusion, installing an interior French drain and sump pump or a complete waterproofing system is a more effective long-term fix.
when should i call a basement waterproofing professional?
You should call a professional if you notice standing water, visible bowing in your foundation walls, recurring leaks around the perimeter, or repeated coating failure after DIY attempts.
Get the Most Out of Your Basement with Erie Home
Waterproofing a basement floor can be a smart first step when you are dealing with light moisture or minor seepage. But lasting protection starts with understanding where the water is coming from and whether the floor is really the only area affected. If moisture is finding its way in through the walls, joints, or foundation, a more complete solution may be the better long-term investment.
If sealing your basement floor is only a temporary fix, your local Erie Home team can help identify where moisture is getting in and recommend the right waterproofing approach for your basement. Request a free estimate today to help protect your home.